Imagine a typical web application during end-to-end testing. The test runner (in this case Cypress.io) is driving the app via its DOM elements; it is clicking and typing and scrolling. The test runner checks if the application behaves correctly by explicitly executing assertions against the displayed text the user sees and implicitly by interacting the elements. But what is going on under the hood? Is the web application correctly processing user actions? In this blog post I will show how to start using web app events in your end-to-end tests with minimal effort. Oh, and you will be able to observe your web application during “normal” browsing too!
You can find the source code for this blog post in repo bahmutov/todomvc-redux-kuker
User Interface Tests
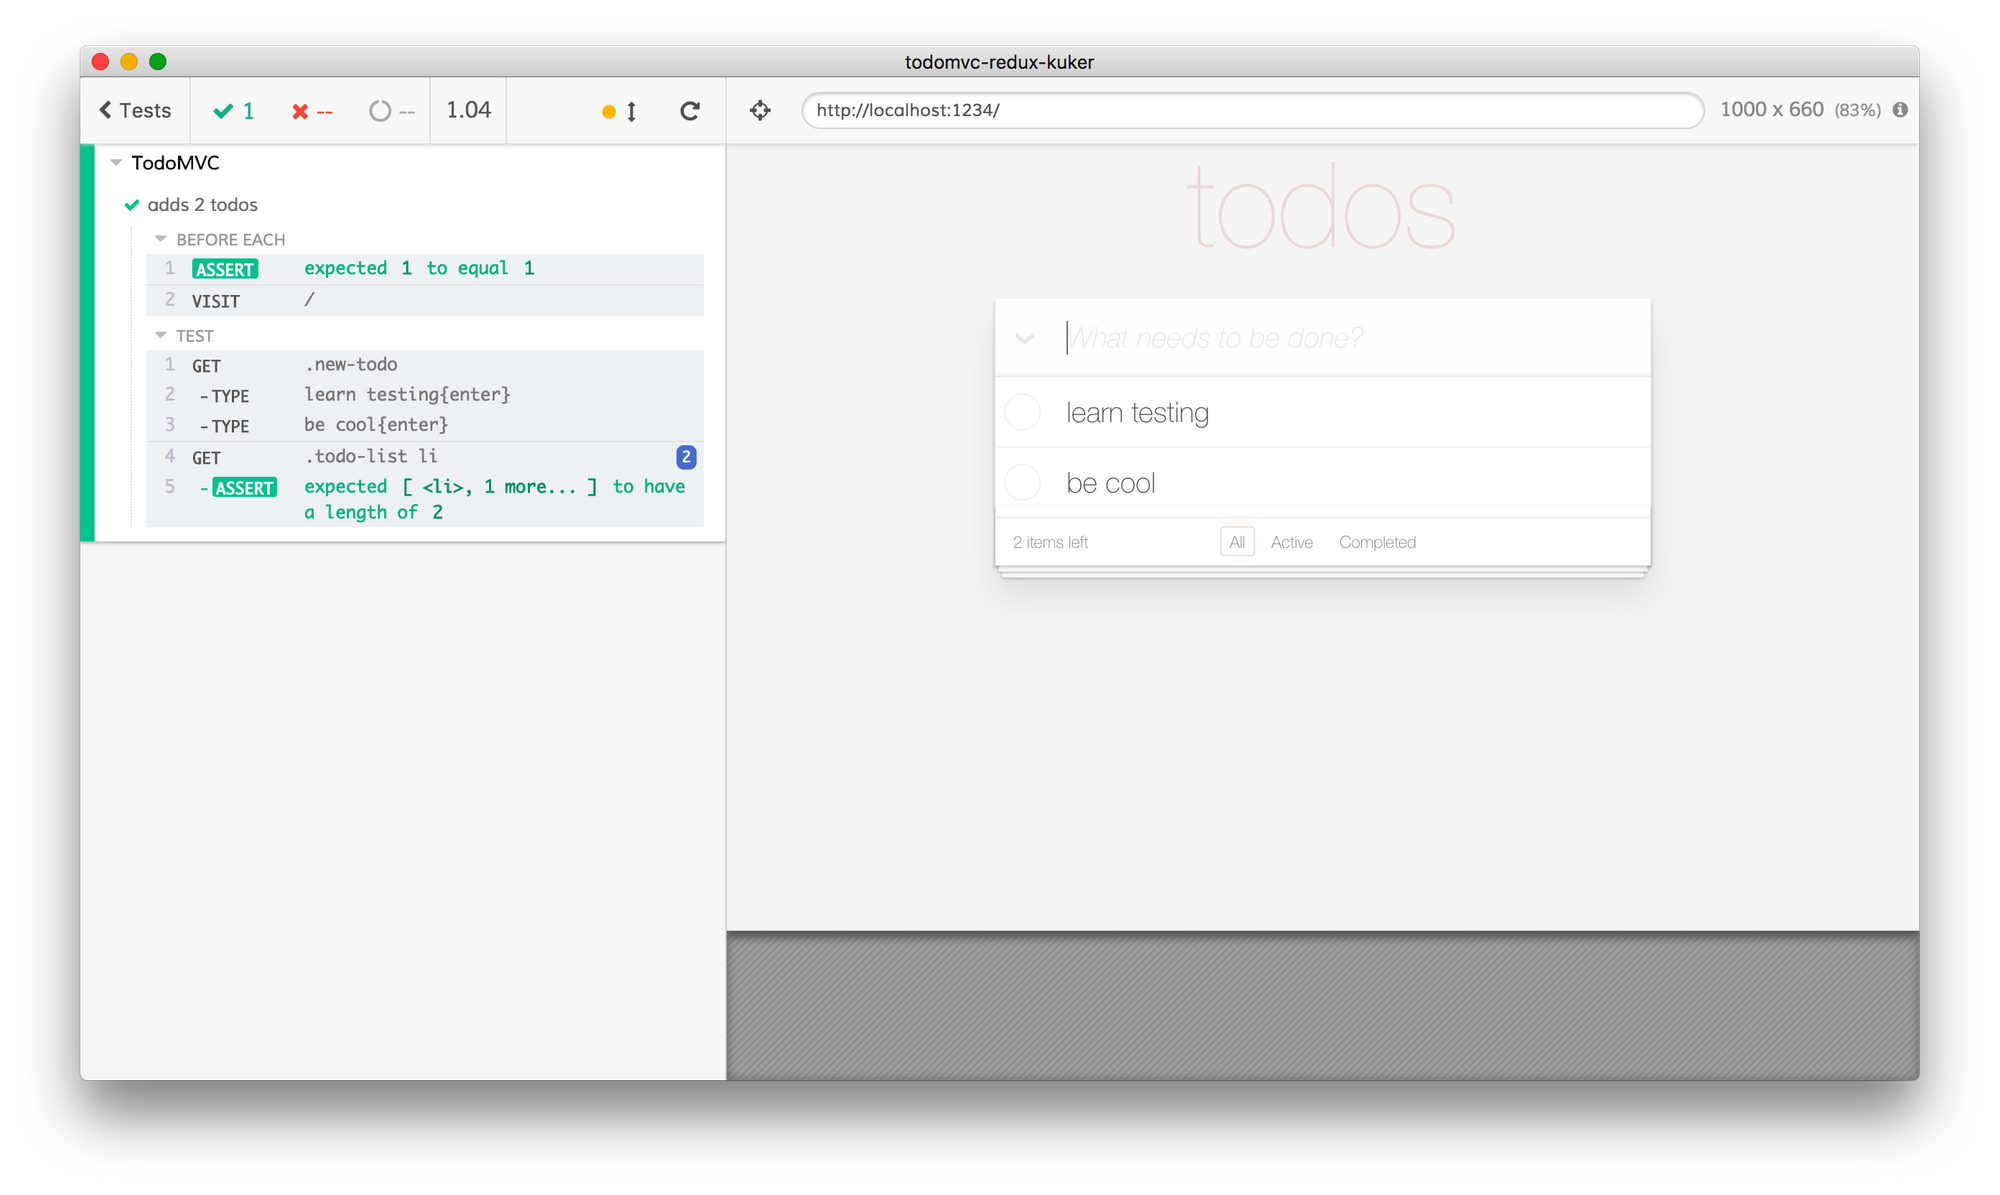
Here is a typical test for a TodoMVC application:
context('TodoMVC', () => {
  beforeEach(() => {
    cy.visit('/')
  })

  it('adds 2 todos', function () {
    cy.get('.new-todo')
      .type('learn testing{enter}')
      .type('be cool{enter}')
    cy.get('.todo-list li').should('have.length', 2)
  })
})
The test runs and passes.
Let’s extend our tests and confirm that we can mark Todo items as completed and clear the completed tasks.
beforeEach(() => {
  cy.visit('/')
})

it('clears completed', () => {
  cy.get('.new-todo')
    .type('first{enter}')
    .type('second{enter}')
    .type('third{enter}')
    .type('fourth{enter}')
  cy.get('.todo-list li').should('have.length', 4)
  // now mark 2 items completed and clear them
  cy.contains('li', 'second')
    .find('.toggle')
    .check()
  cy.contains('li', 'fourth')
    .find('.toggle')
    .check()
  cy.get('.clear-completed').click()
  // only two items should remain
  cy.get('.todo-list li')
    .should('have.length', 2)
    .and(li$ => {
      // make sure the expected items remain
      expect(li$[0].textContent).to.equal('first')
      expect(li$[1].textContent).to.equal('third')
    })
})
The test passes and clears the two completed items.
If we only care about the functionality of the page, these tests are enough. But a web application is an onion. The user interface is a view layer on top of the model layer that actually updates the data in response to the user’s actions. Does the model layer perform correctly during the test? Ordinarily, we would test the model layer via unit tests, but with Cypress we can interact with the application code from our tests. In particular, we can reach into the application code and stub or spy on the model’s methods. See these blog posts:
But in our case, we want a lightweight way to confirm that the model performs the expected actions, in the right order, and the final model state is correct. Here is how we can achieve this in just 3 lines of JavaScript code.
Application Events
I will bring a library called “Kuker” from https://github.com/krasimir/kuker - it is both an event emitter for major web frameworks and a Chrome DevTools extension similar to the very popular Vue.js DevTools and React Developer Tools.
npm i -S kuker-emitters
Since my example is a React application that uses Redux, and I am interested in observing the Redux data store, I will wrap my application data store in the middleware like this:
// src/index.js
import { ReduxEmitter } from 'kuker-emitters'
import { createStore, applyMiddleware } from 'redux'
import reducer from './reducers'

const middleware = ReduxEmitter()
const store = createStore(reducer, applyMiddleware(middleware))
After wrapping my reducer in the ReduxEmitter and reloading the application in Chrome with Kuker DevTools extension installed I see events from the Redux store. For example, if I add 2 items and toggle the second item, the extension shows the following:
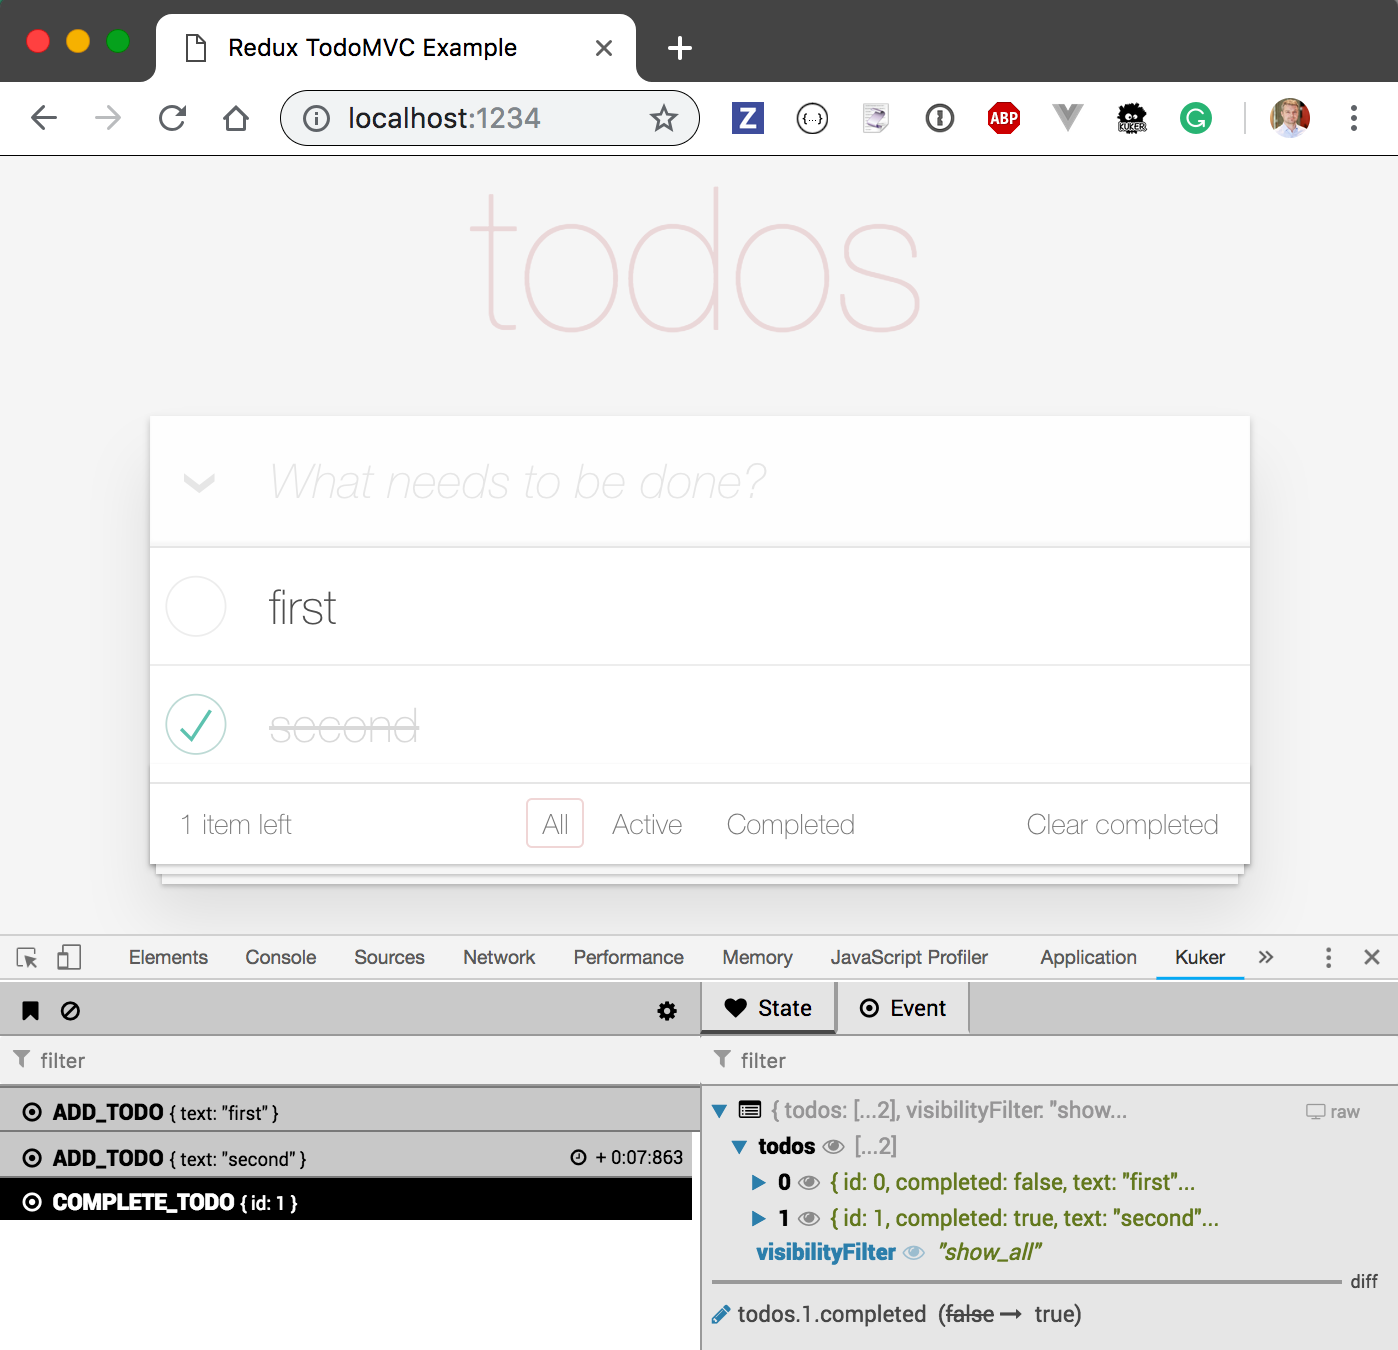
Great, I can see the Redux events, see the details for a particular event, and I can go back in time to inspect the store after any event - this all is super convenient while working with the application locally or in production. But what about our tests? Can we observe the same events from our end-to-end tests and make assertions against them?
Observing Emitted Events in Tests
Window to window, or iframe to iframe, or web application to extension communications inside the browser happen through window.postMessage calls. Thus, from our end-to-end tests we should be able to receive messages meant for the Kuker extension if we can spy on the postMessage method. We can start spying right away during the initial cy.visit command:
/// <reference types="Cypress" />
describe('Spying on Kuker messages', () => {
  beforeEach(() => {
    cy.visit('/', {
      onBeforeLoad (win) {
        // start spying
        cy.spy(win, 'postMessage')
      }
    })
  })

  it('adds 2 todos', function () {
    cy.get('.new-todo')
      .type('learn testing{enter}')
      .type('be cool{enter}')
    cy.get('.todo-list li').should('have.length', 2)
  })
})
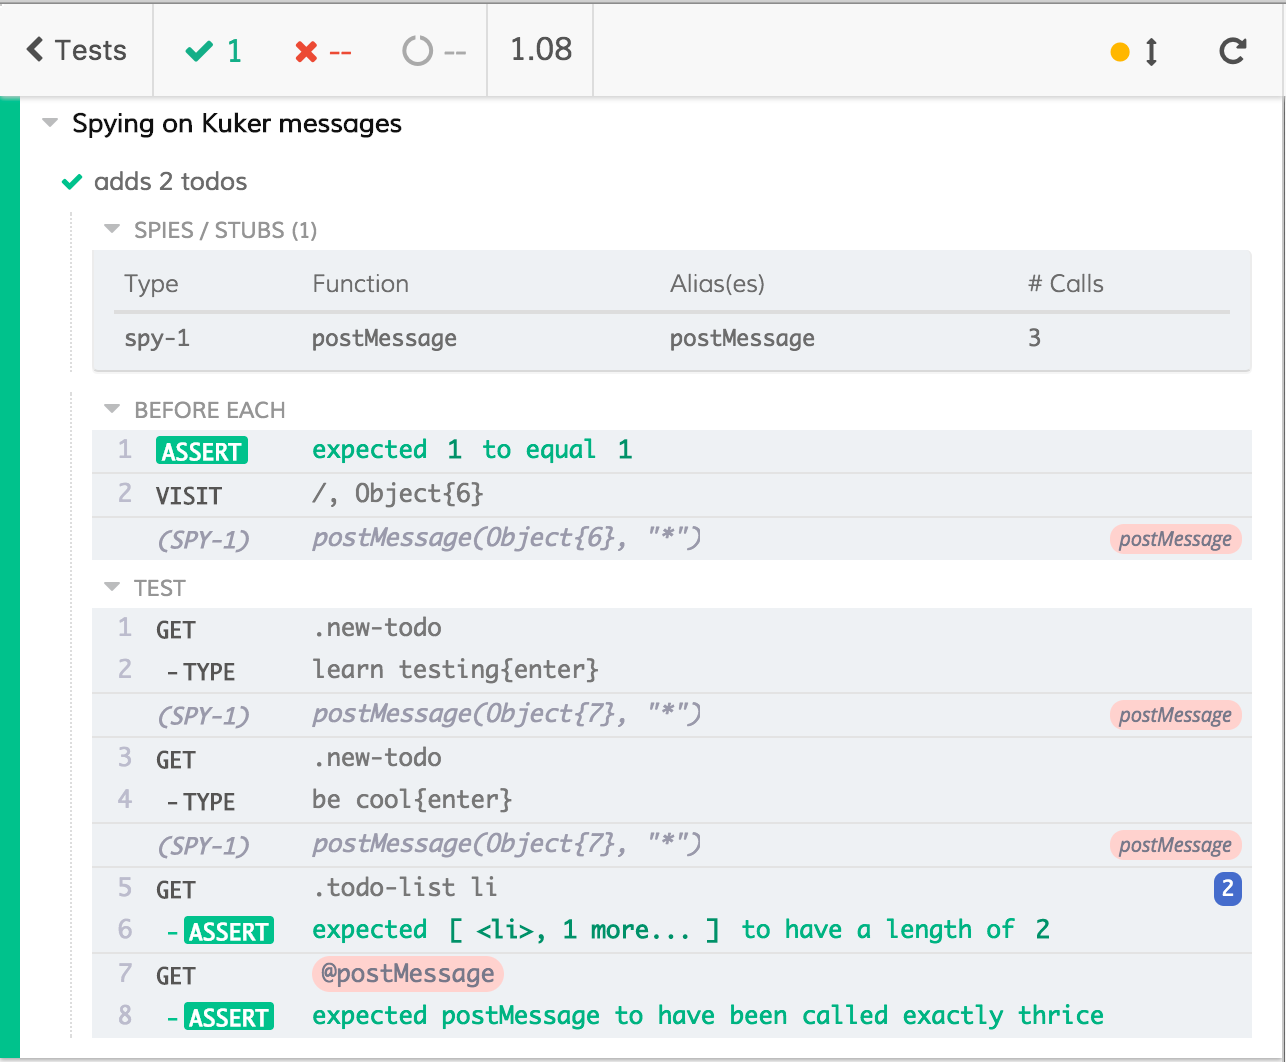
The Command Log now shows 3 observed calls: the first was the "new emitter" event from Kuker, and the second and third calls were the "ADD_TODO" actions.

Even with this simple spying we can confirm that we receive 3 messages from the application. We just need to give our spy an alias and make an assertion.
describe('Spying on Kuker messages', () => {
  beforeEach(() => {
    cy.visit('/', {
      onBeforeLoad (win) {
        // start spying
        cy.spy(win, 'postMessage').as('postMessage')
      }
    })
  })

  it('adds 2 todos', function () {
    cy.get('.new-todo').type('learn testing{enter}')
    cy.get('.new-todo').type('be cool{enter}')
    cy.get('.todo-list li').should('have.length', 2)
    // confirm the expected number of events
    cy.get('@postMessage').should('be.calledThrice')
  })
})
Notice the number of calls made to the spy in the "Spies and Stubs" table above the commands.
We can click on any command in the Command Log and see the argument object passed by the Kuker emitter; the Cypress Test Runner has a time-traveling debugger too!
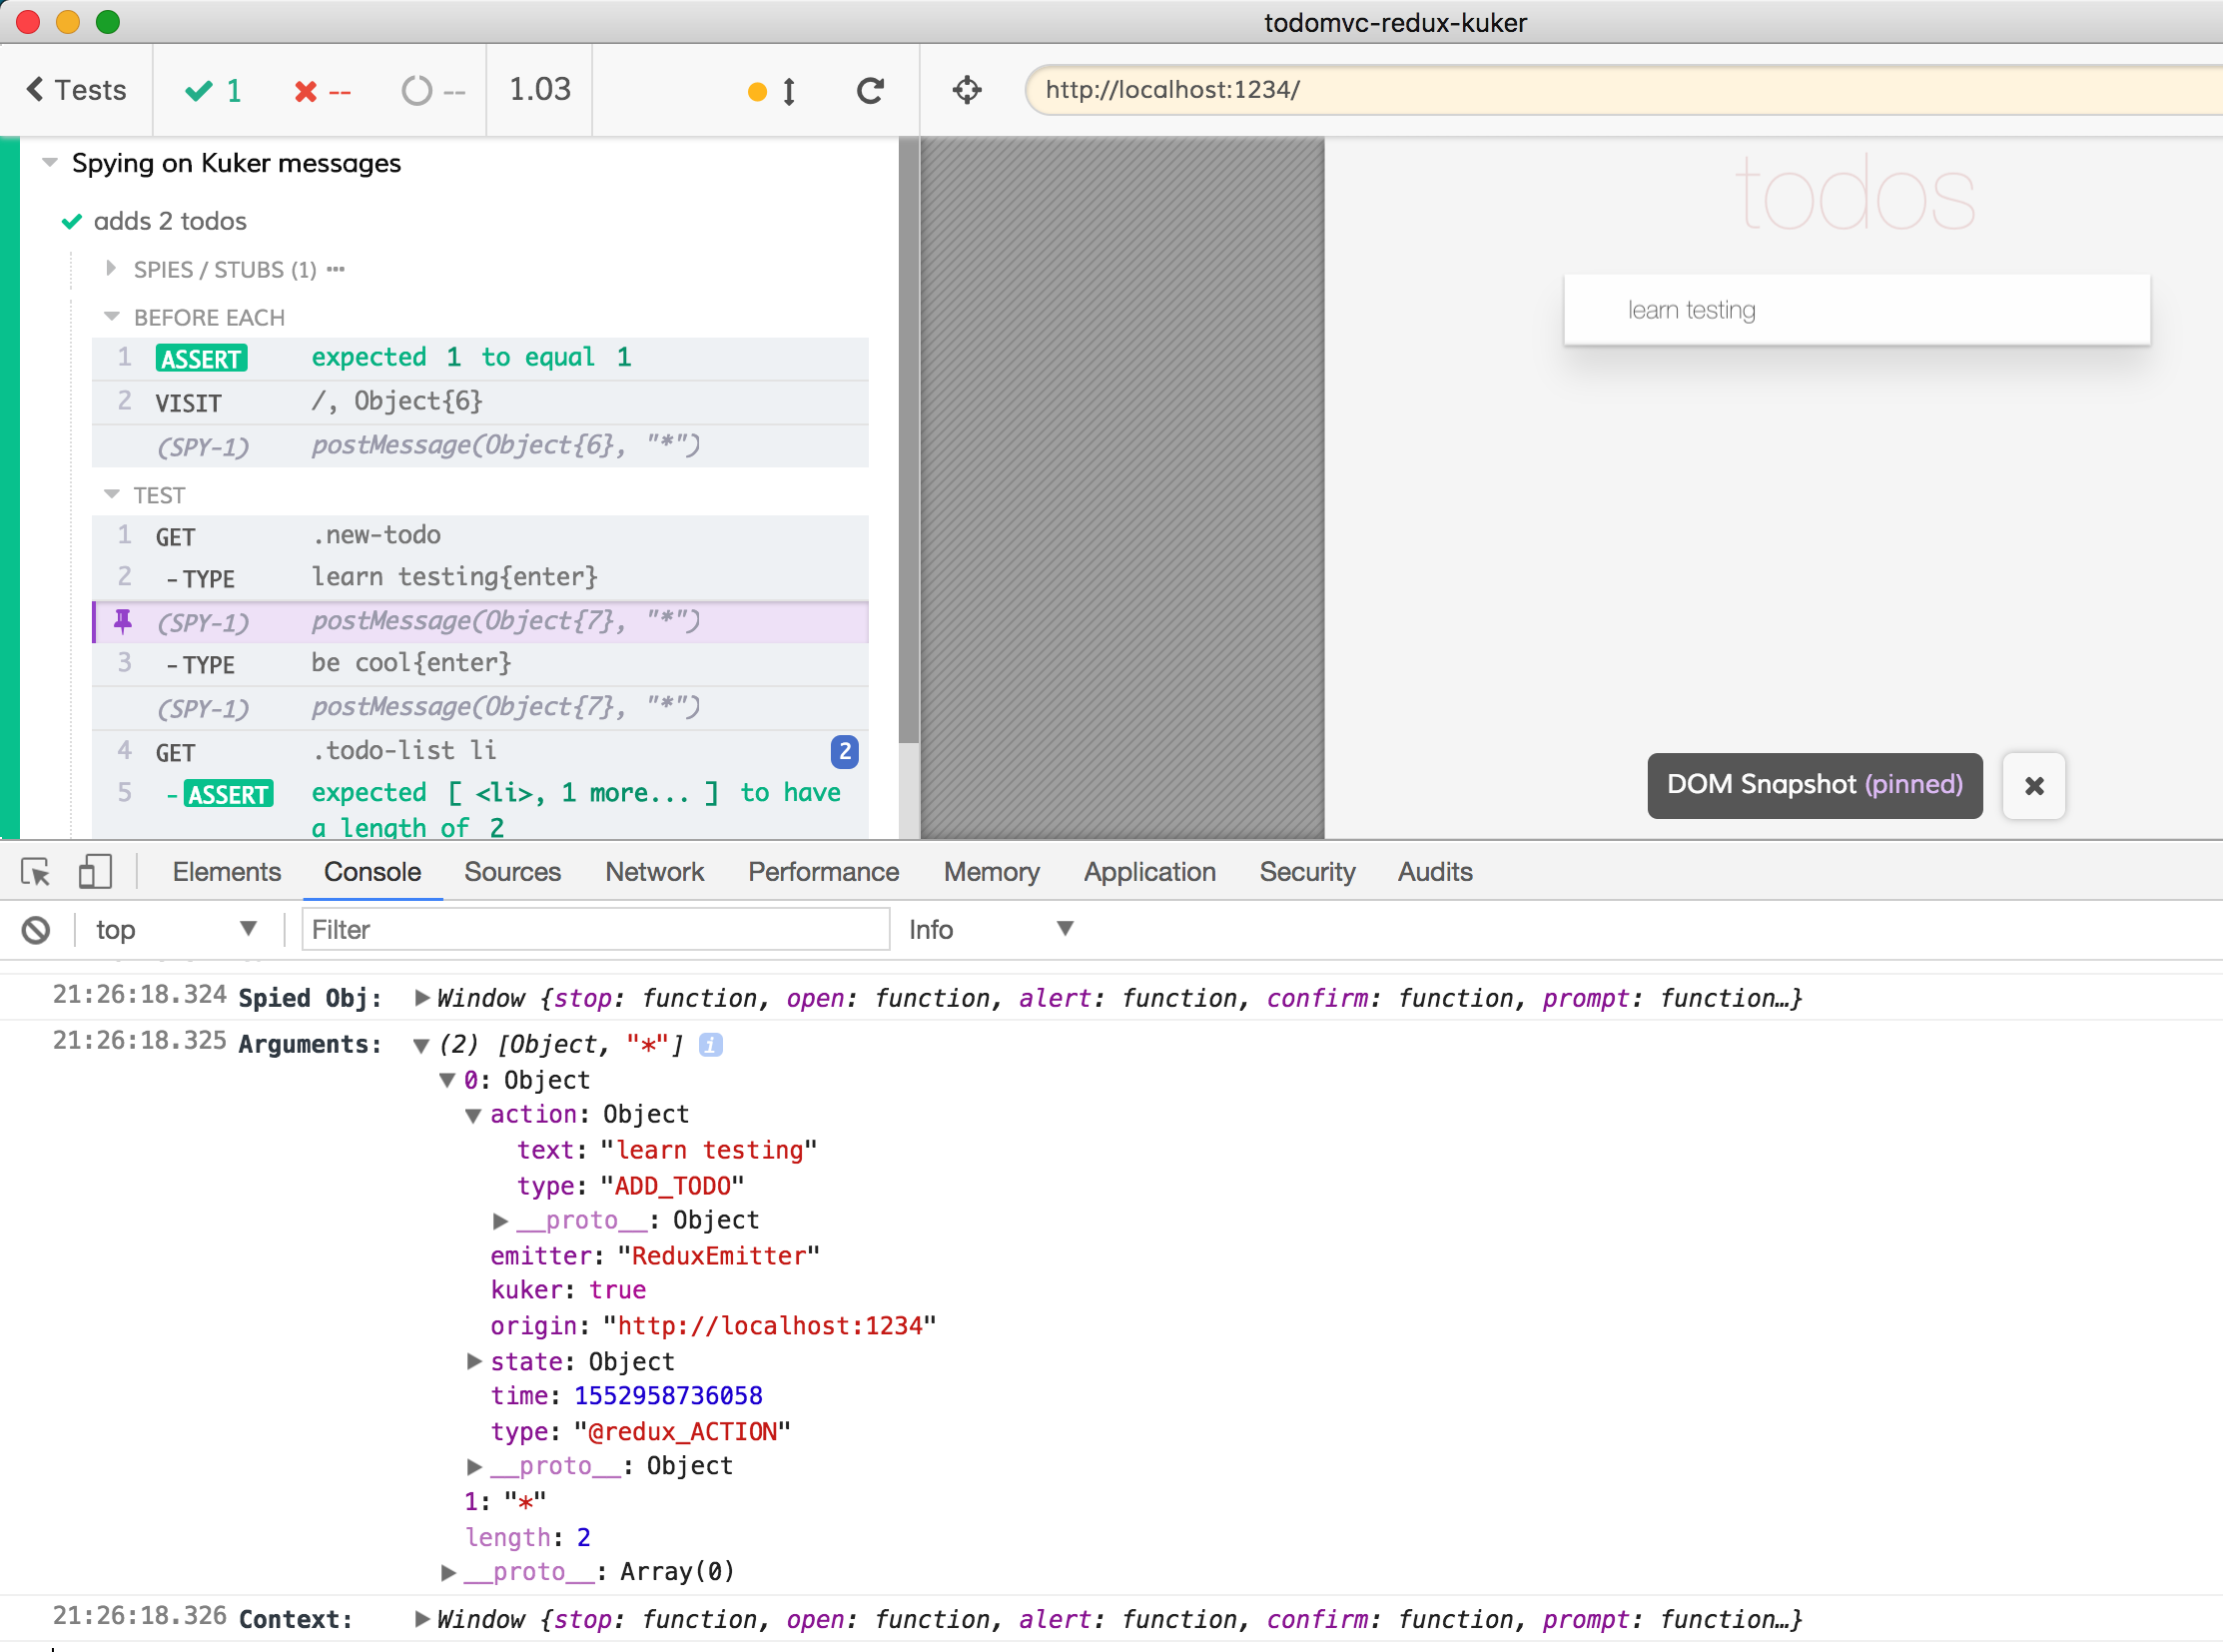
I would like to confirm the action and state objects passed inside the message - we know their expected values. But there is a problem: there are unpredictable timestamps in the event object, which makes the exact object comparison very difficult. I could sanitize the Kuker messages using JSON Schemas, but for now we can just extract the desired properties and keep using cy.spy. Here is how to do it.
First, define an empty cy.spy and route the cleaned up events by calling it ourselves:
// make sure we are only spying on Kuker Redux events (except for init)
const isKukerRedux = what =>
  Cypress._.isPlainObject(what) && what.kuker && what.type !== 'NEW_EMITTER'
// only pick properties we want for testing
const reduxEvent = event => Cypress._.pick(event, 'action', 'state')

describe('Clean Kuker messages', () => {
  let kuker

  beforeEach(() => {
    kuker = null
    cy.visit('/', {
      onBeforeLoad (win) {
        kuker = cy.spy().as('kuker')

        const postMessage = win.postMessage.bind(win)
        win.postMessage = (what, target) => {
          if (isKukerRedux(what)) {
            // call the spy function ourselves
            // passing the sanitized event
            kuker(reduxEvent(what))
          } // else ignore messages
          return postMessage(what, target)
        }
      }
    })
  })

  it('adds 2 todos', function () {
    // same test that adds 2 todos
  })
})
In the above test we invoke the kuker spy function with a sanitized argument that has values we can compare deterministically.
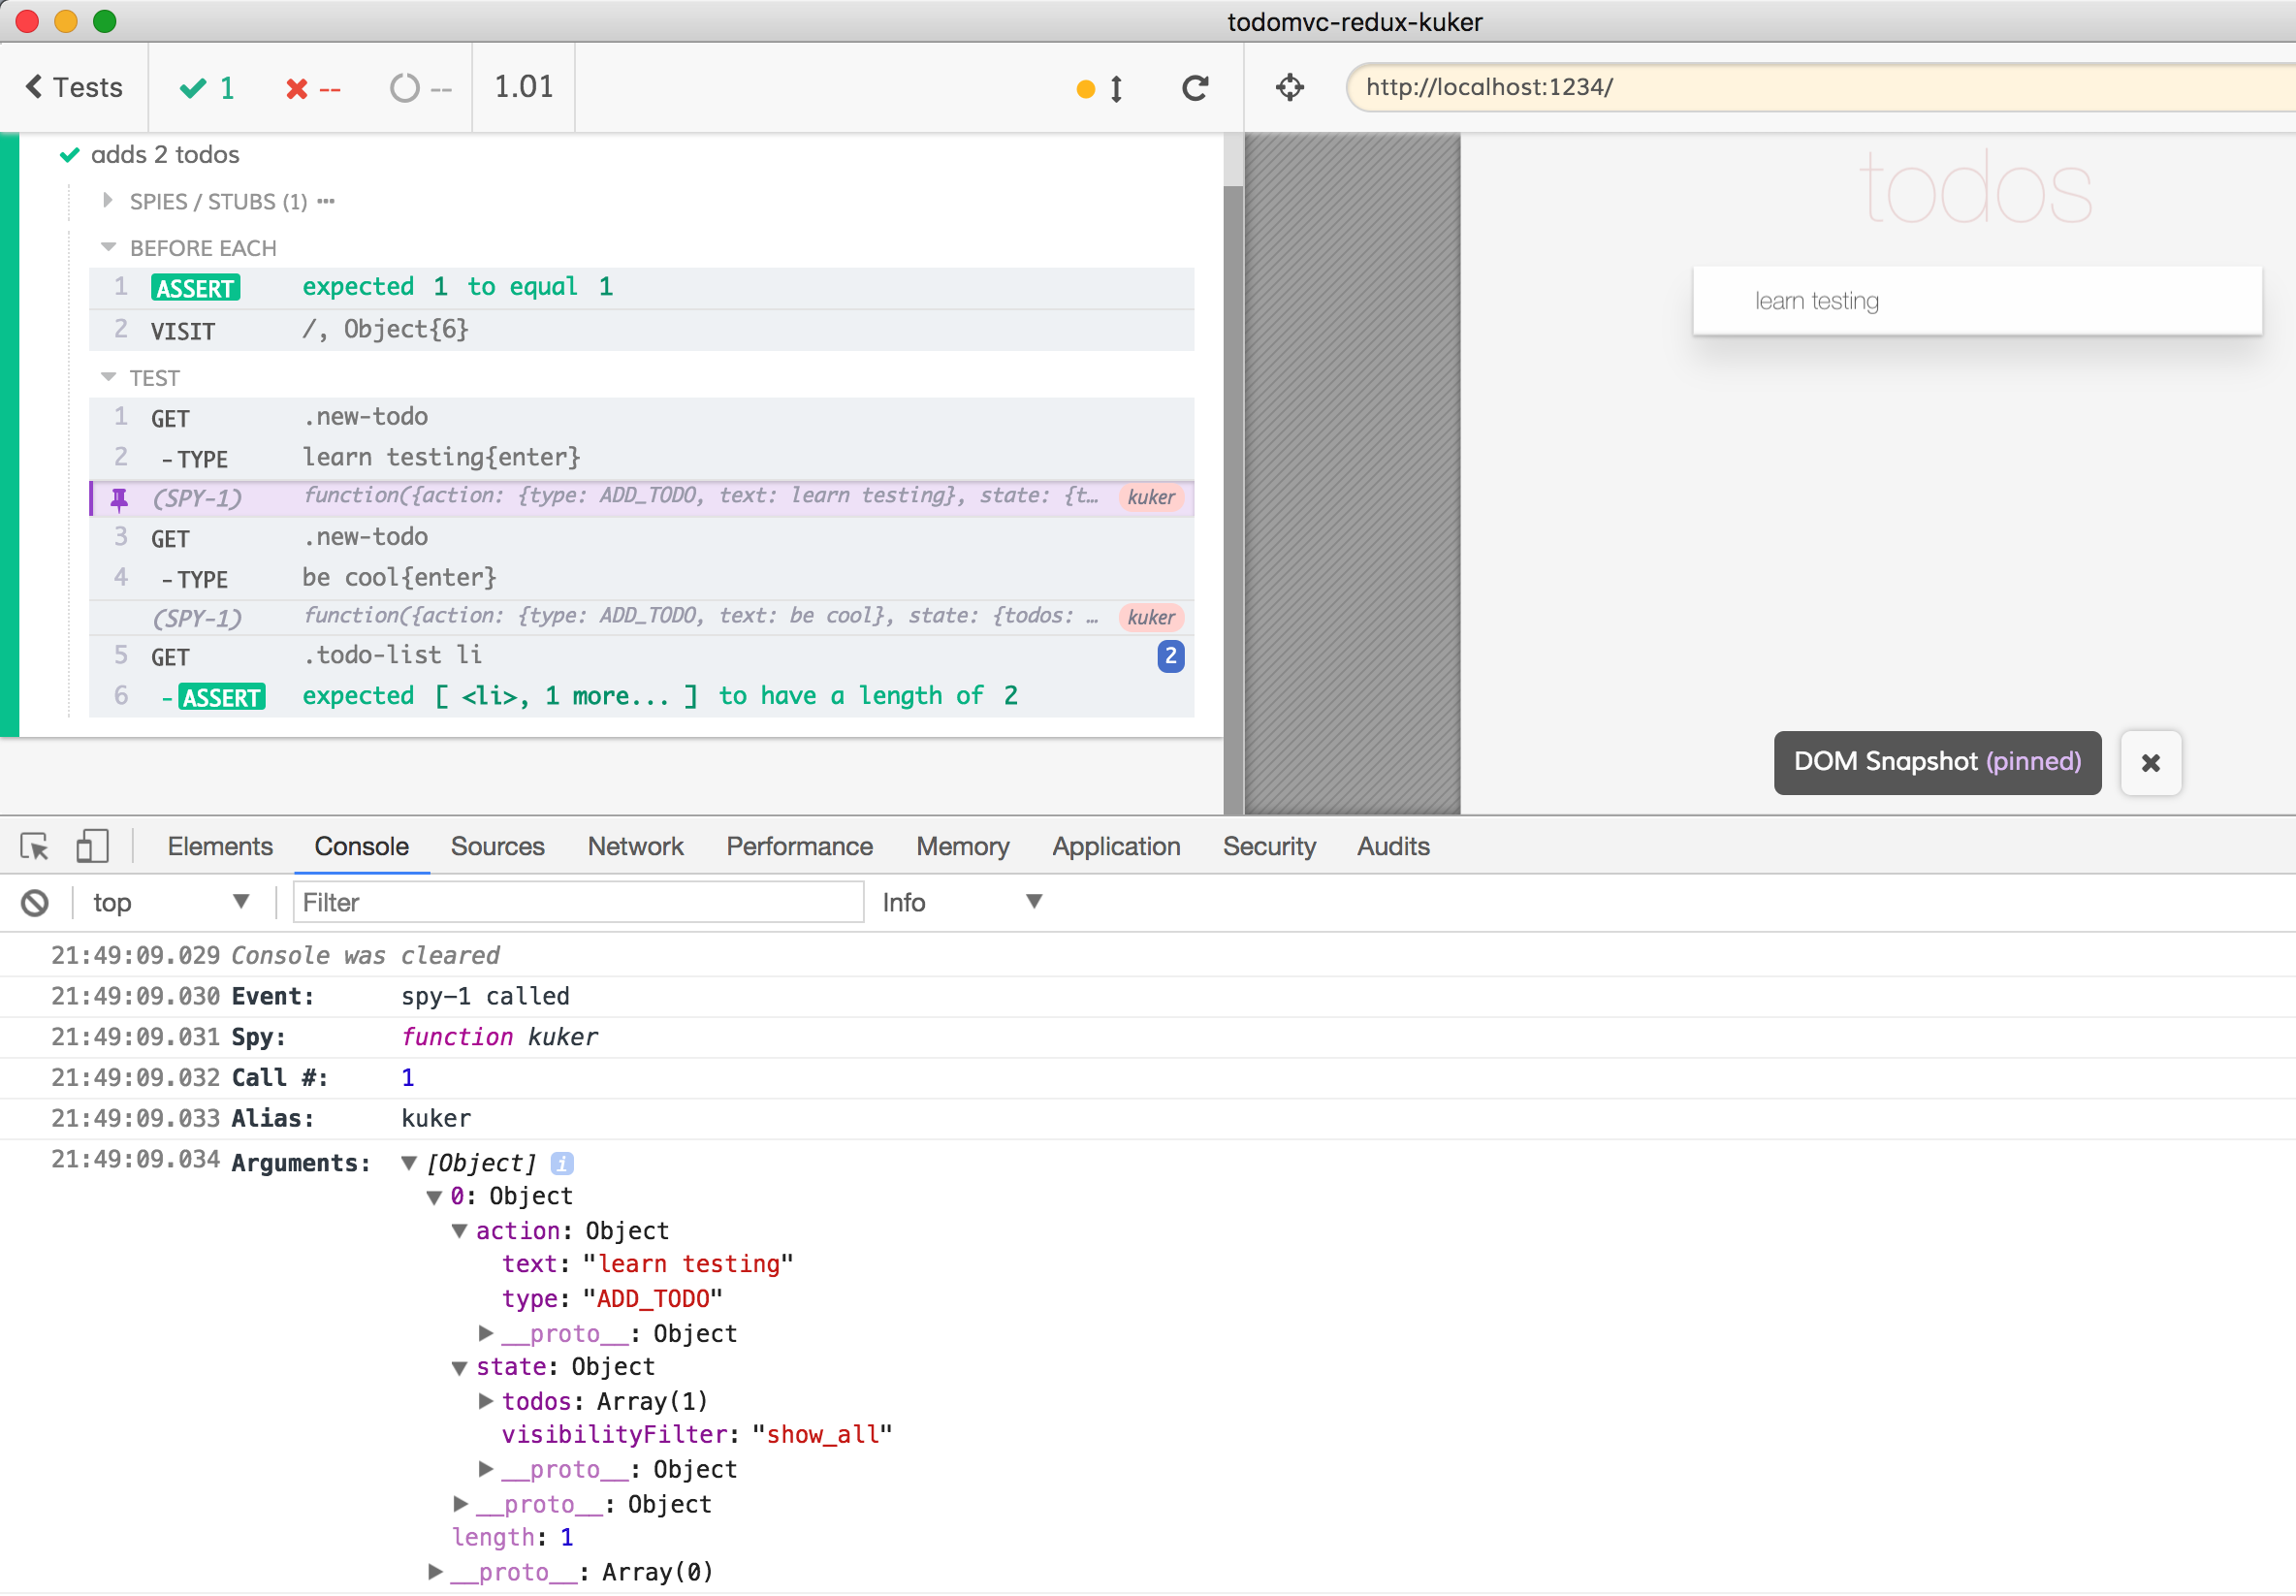
A very convenient way to see such events in the Command Log is to call Cypress.log ourselves with a subset of data.
if (isKukerRedux(what)) {
  const sanitized = reduxEvent(what)
  kuker(sanitized)

  // log better message ourselves
  Cypress.log({
    name: 'Redux',
    message: `${what.action.type} "${what.action.text}"`,
    consoleProps () {
      return sanitized
    }
  }).end()
}
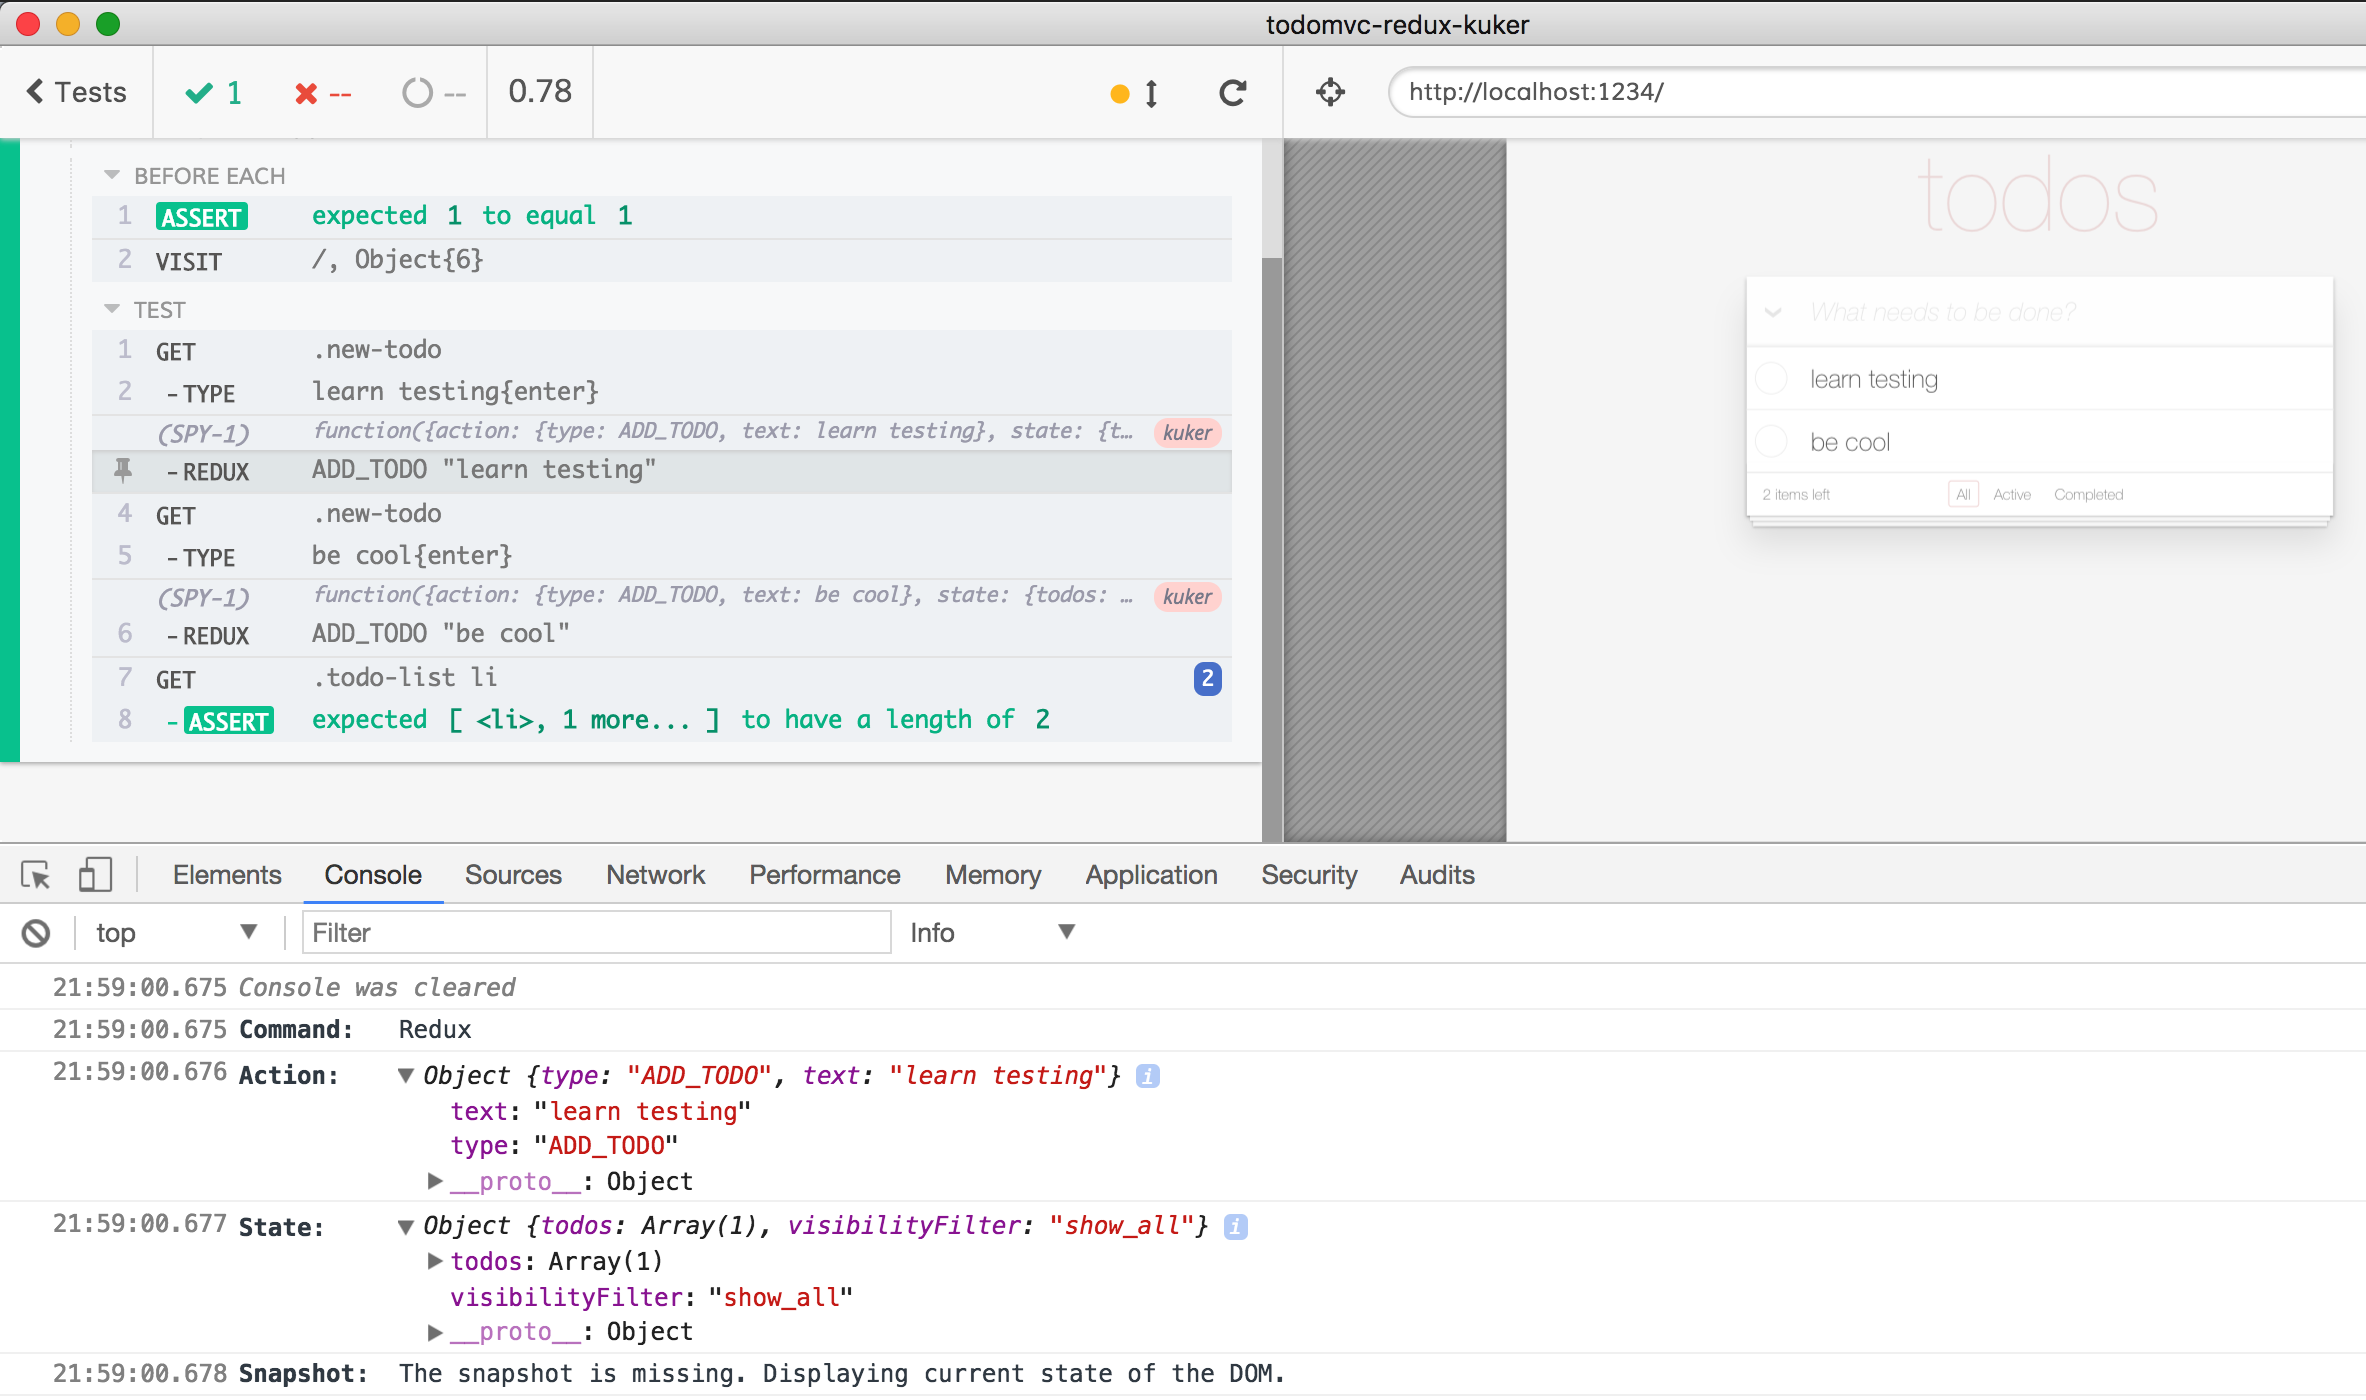
When clicking on the "REDUX" command in the Test Runner Command Log, the DevTools console shows the properties of the sanitized object. Note the message "The snapshot is missing" - it is shown because I did not invoke Cypress.log(...).snapshot(). The DOM snapshot would be incorrect in our case - the UI has not been refreshed yet when the Redux event was sent, thus I find the snapshot more confusing than helpful.
With deterministic data flowing to the kuker spy function, we can confirm the last event we receive after adding a new item through the application's user interface.
cy.get('.new-todo').type('learn testing{enter}')
// confirm the first Redux event
cy.get('@kuker')
  .its('lastCall.args.0')
  .should('deep.equal', {
    action: { type: 'ADD_TODO', text: 'learn testing' },
    state: {
      todos: [
        {
          completed: false,
          id: 0,
          text: 'learn testing'
        }
      ],
      visibilityFilter: 'show_all'
    }
  })
Then we can similarly confirm the Redux event after the second item has been added.
cy.get('.new-todo').type('be cool{enter}')
// confirm the second Redux event
cy.get('@kuker')
  .its('lastCall.args.0')
  .should('deep.equal', {
    action: { type: 'ADD_TODO', text: 'be cool' },
    state: {
      todos: [
        {
          completed: false,
          id: 0,
          text: 'learn testing'
        },
        {
          completed: false,
          id: 1,
          text: 'be cool'
        }
      ],
      visibilityFilter: 'show_all'
    }
  })
As the objects keep growing, the tests become harder to read. We can move the expected values into fixture files and keep them away from the test code. For example, here is cypress/fixtures/first-event.json file:
{
  "action": {
    "type": "ADD_TODO",
    "text": "learn testing"
  },
  "state": {
    "todos": [
      {
        "completed": false,
        "id": 0,
        "text": "learn testing"
      }
    ],
    "visibilityFilter": "show_all"
  }
}
Similarly, there is cypress/fixtures/second-event.json with the object expected in the second event. We can load both of these in beforeEach callback.
beforeEach(() => {
  // load two fixtures
  cy.fixture('first-event').as('first')
  cy.fixture('second-event').as('second')

  cy.visit('/', { ... })
})
By assigning the loaded fixture an alias using as(<name>) inside a beforeEach hook we set the object as property on the Mocha’s test context object, making it available inside the test callback under this.<name> but only if the test uses function () { ... } form, and not the fat arrow expression (see the “Fixtures” recipe in cypress-example-recipes for details). With loaded fixtures, our test becomes readable and short:
// notice "function" form of callback
// this is because we need to use "this.first" property
it('adds 2 todos', function () {
  cy.get('.new-todo').type('learn testing{enter}')

  // confirm the first Redux event
  cy.get('@kuker')
    .its('lastCall.args.0')
    // use loaded fixture "first"
    .should('deep.equal', this.first)

  cy.get('.new-todo').type('be cool{enter}')
  // confirm the second Redux event
  cy.get('@kuker')
    .its('lastCall.args.0')
    .should('deep.equal', this.second)

  cy.get('.todo-list li').should('have.length', 2)
})
The test is passing, and as always in Cypress tests it runs as quickly as the web application allows.
💡 You can avoid hardcoding the expected objects as fixtures or in tests by using the great cypress-plugin-snapshots plugin. I will show an example in the last section of this post.
Handling Web Application Delays
The web is unpredictable, and our tests better expect random delays when events arrive. Let's add to the TodoMVC application a 1 second delay after entering a new item.
<TodoTextInput
  newTodo
  onSave={text => {
    if (text.length !== 0) {
      // add artificial delay to the app
      setTimeout(addTodo, 1000, text)
    }
  }}
  placeholder='What needs to be done?'
/>
Thanks to the built-in retry-ability in Cypress commands and assertions, the tests do not have to change at all. Each command like its below for example will retry, until the assertion that follows it .should('deep.equal', this.first) succeeds.
cy.get('@kuker')
.its('lastCall.args.0')
// use loaded fixture "first"
.should('deep.equal', this.first)
Notice how commands are shown with blue spinners while they retry - the commands pass as soon as the Kuker emitter sends the expected event.
Sending Custom Events
The Kuker library provides emitters for the most popular web frameworks today: React, Angular, Vue, and a few others. Then there is the BaseEmitter instance that you can use to emit your own events.
You can find the source code for the demo used in this section in its own repo bahmutov/cypress-kuker-example
My example is a Hyperapp counter application. Since we are interested in observing the model events in our tests, the view function remains unchanged. The important part in the code below is that the application invokes “up” and “down” actions on button clicks.
const view = (state, actions) => {
  return (
    <main>
      <h1>{state.count}</h1>
      <button data-cy='down' onclick={actions.down}
        disabled={state.count <= 0}>
        ー
      </button>
      <button data-cy='up' onclick={actions.up}>
        +
      </button>
    </main>
  )
}
Because Kuker does not include a Hyperapp emitter, we need to construct an emitter ourselves:
import { BaseEmitter } from 'kuker-emitters'
const kuker = BaseEmitter()
I will emit the events from the actions methods, I just need to call the function kuker returned by the BaseEmitter() factory method. There are multiple properties the Kuker DevTools can receive that control what is displayed for each event. We can send the state, any action data, an optional background color and even a Font Awesome icon name that better describes what the web application is doing.
const actions = {
  down: e => state => {
    const newState = {
      ...state,
      count: state.count - 1
    }
    // emit the "down" event
    kuker({
      type: 'count',
      label: 'down',
      state: newState,
      icon: 'fa-arrow-down',
      color: '#ff0000'
    })
    return newState
  },
  up: e => state => {
    const newState = {
      ...state,
      count: state.count + 1
    }
    // emit the "up" event
    kuker({
      type: 'count',
      label: 'up',
      state: newState,
      icon: 'fa-arrow-up',
      color: '#00ff00'
    })
    return newState
  }
}
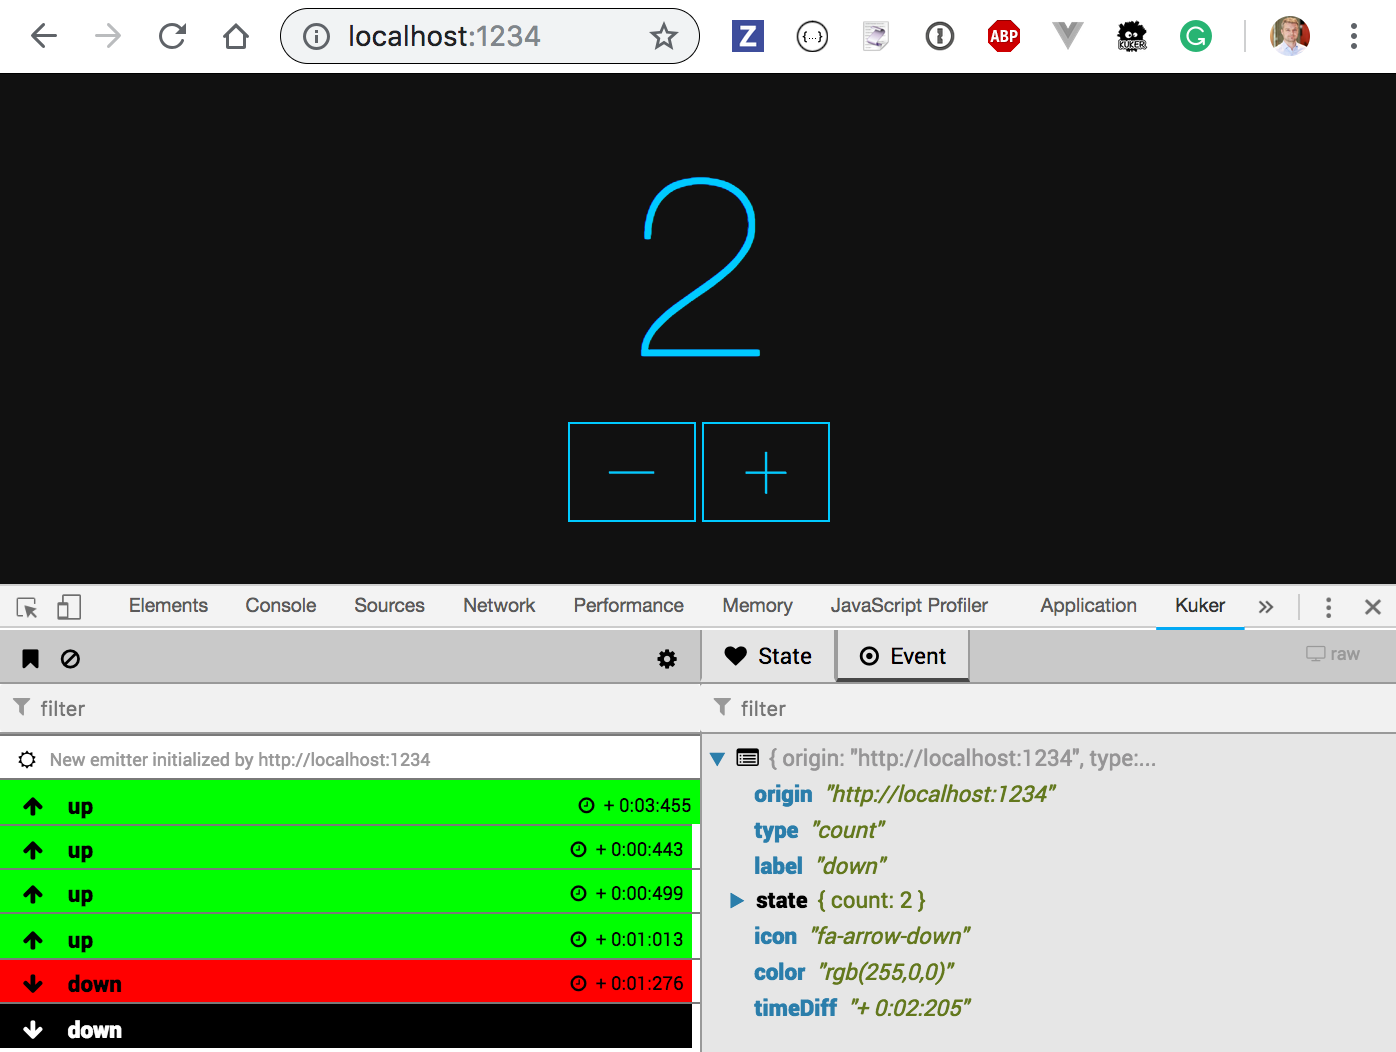
When using the application, the Kuker Extension shows the "Up" and "Down" events.
It is up to me, the web application developer, to decide if and how to use the events emitted by the application in my end-to-end tests. I personally prefer to keep my tests independent from the implementation, and in this case would simply confirm that the emitted list of events matches the expected list in some key properties: the label and the updated state. Using the spy mechanism described above, we can remember the events we see in each test:
context('Counter with Kuker', () => {
  let kukerEvents

  beforeEach(() => {
    kukerEvents = []
    cy.visit('/', {
      onBeforeLoad (win) {
        const postMessage = win.postMessage.bind(win)
        win.postMessage = (what, target) => {
          if (isKuker(what)) {
            kukerEvents.push(Cypress._.pick(what, 'label', 'state'))
          }
        }
      }
    }
  })
  // test to follow
})
In each test we will have our own list of Kuker events. Let us confirm the events list after clicking the "+" button several times and then clicking the "-" button twice.
it('clicks up and down', () => {
  cy.get(sel('up'))
    .click()
    .click()
    .click()
  cy.get(sel('down'))
    .click()
    .click()
  cy.contains('h1', '1')
  cy.wrap(kukerEvents).toMatchSnapshot()
})
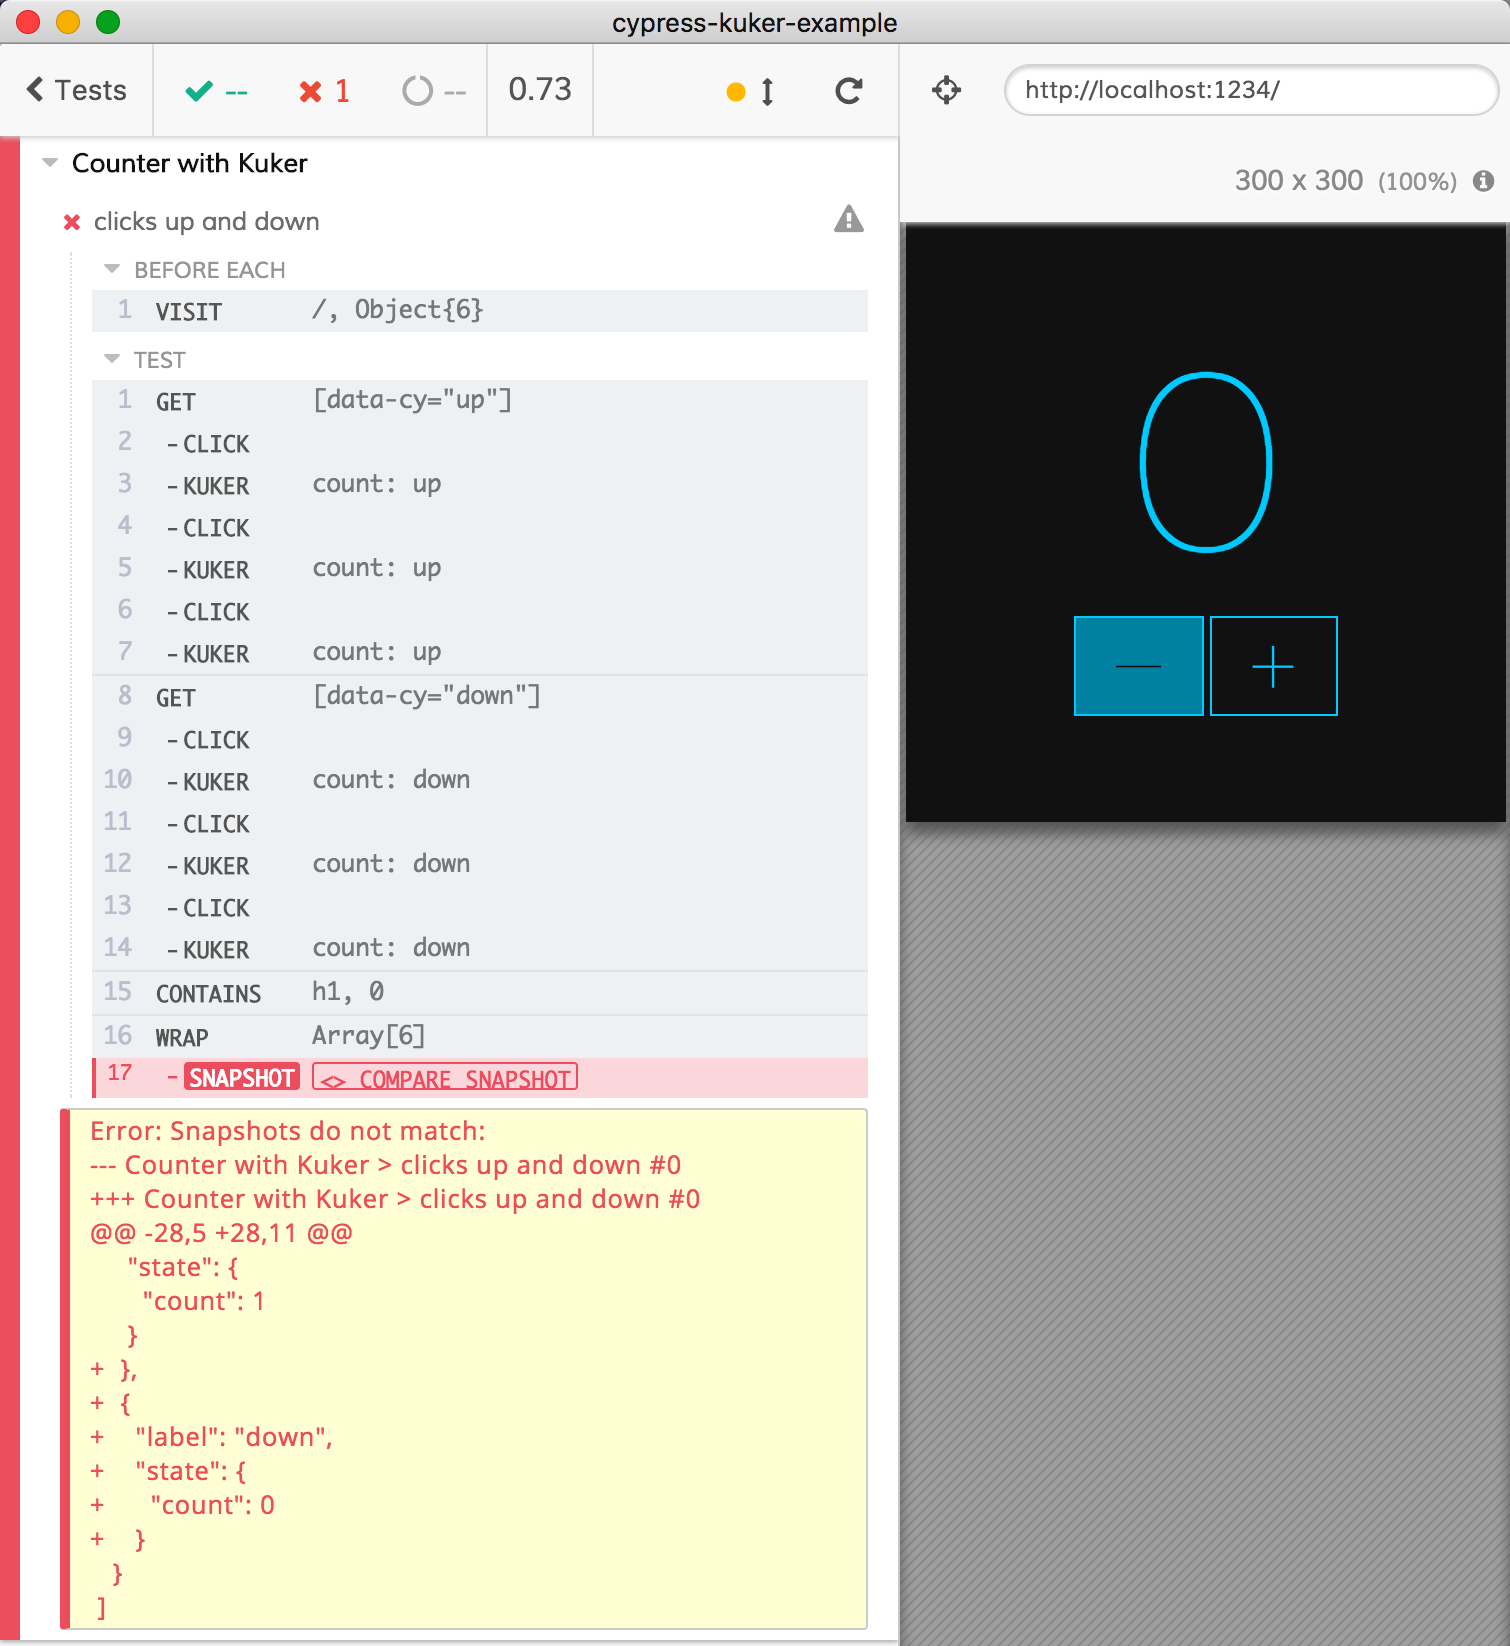
We are checking the list of received events using cypress-plugin-snapshots which makes reviewing and accepting test snapshots changes a breeze. In our current test, the very first events list has been saved as a JS file and will be compared with the value produced on each run. As long as the web application emits the same events, the test will stay green.
If we change the test and click the "-" button one extra time, the new list of objects will no longer match the saved snapshot, prompting us to review the changes and either accept the change or fail the test.
Click on the "Compare Snapshot" button to review the changes and accept them.
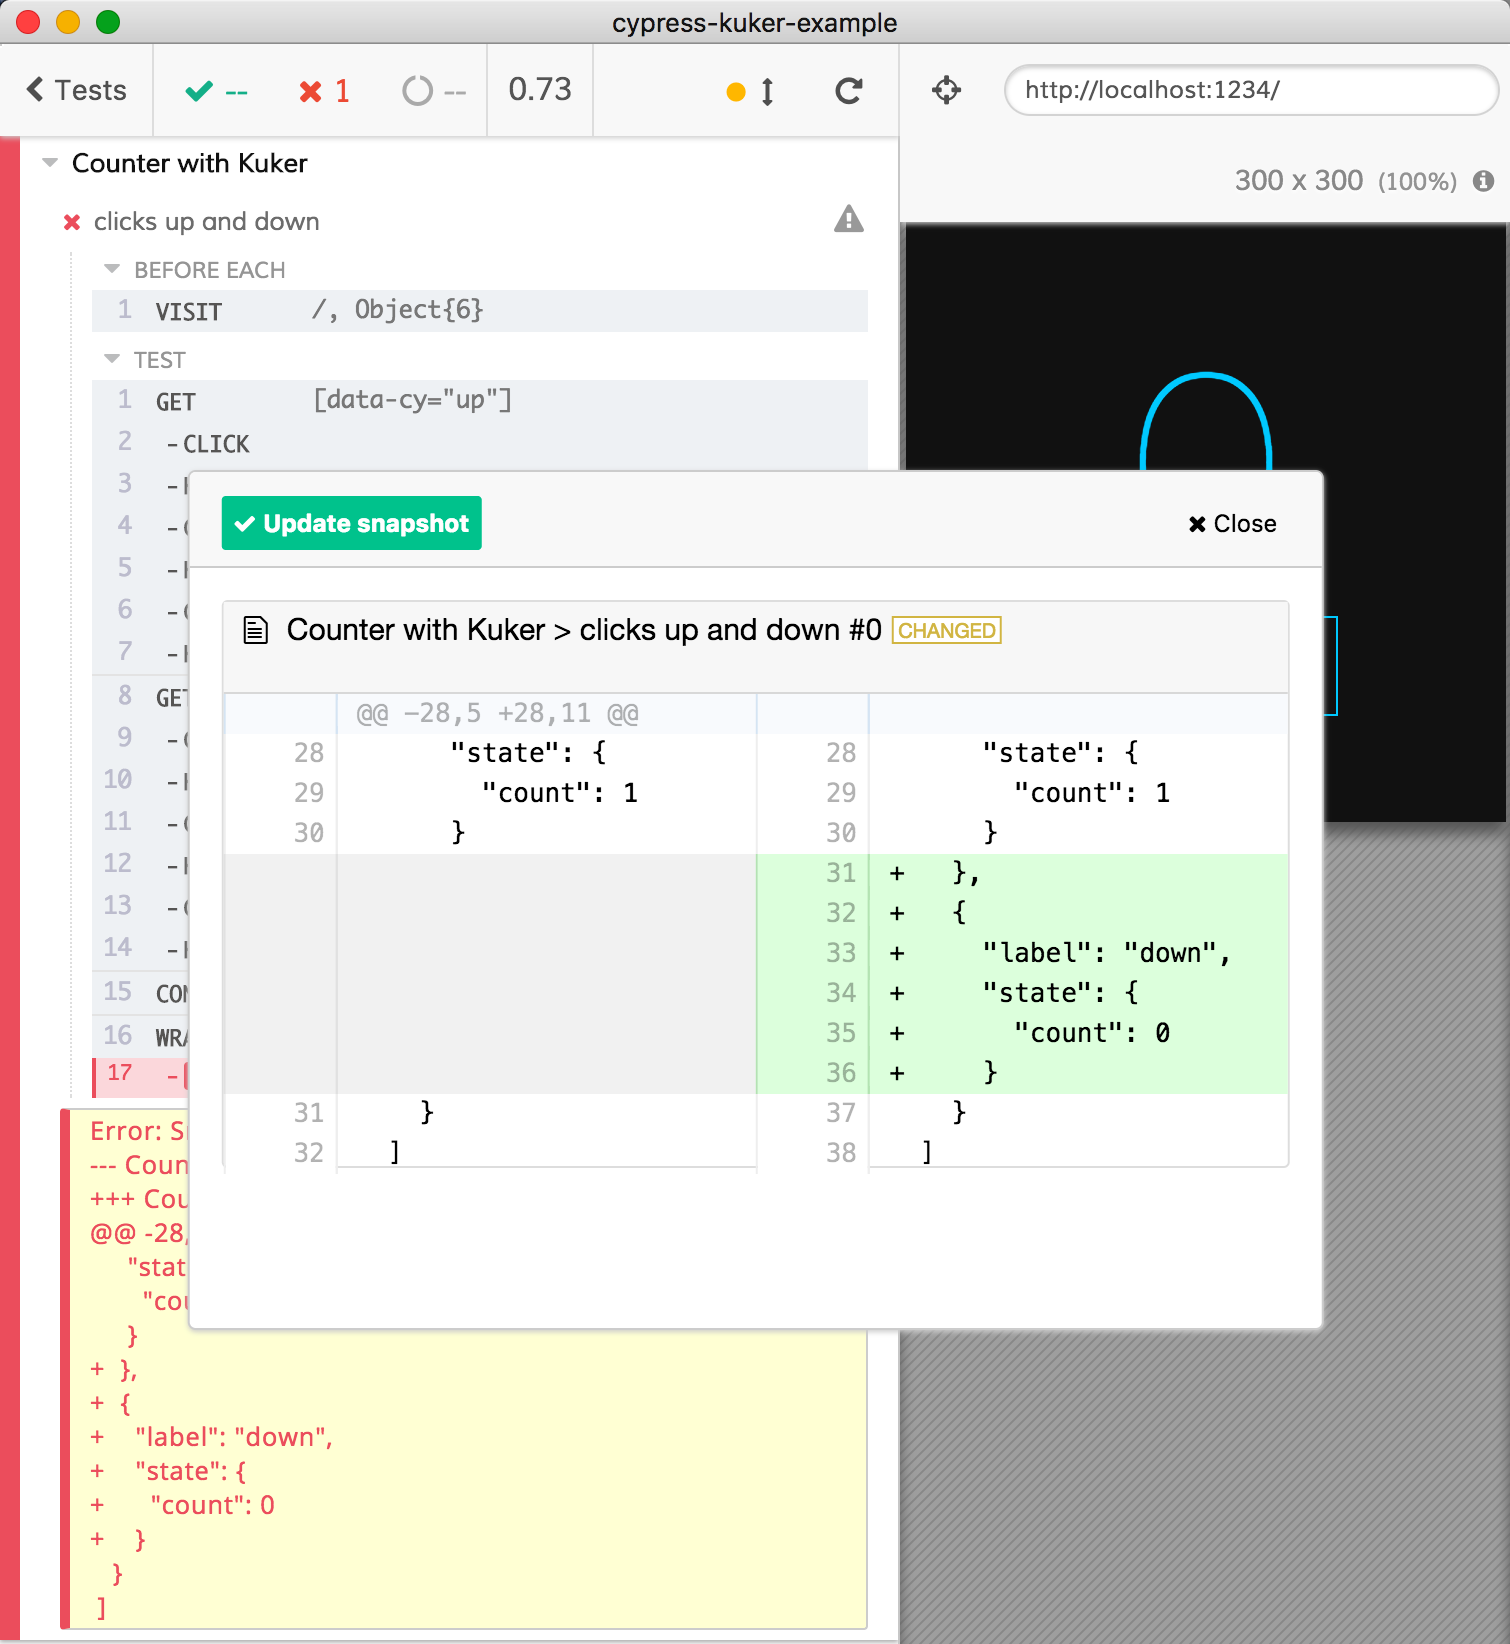
Remember, Cypress is just a web application so you can show your own user interface if needed!
Final Thoughts
End-to-end tests can verify the web application behavior through the user interface alone. Or they can listen to the events emitted by the app to verify the underlying model updates - and the tests can achieve this without major code changes or testing the app's internals. Of course, every application is different, and you - the developer - should make the call how the test should proceed. Cypress just gives you the power to pick the most effective path to well tested software.